Drop Shadows and Snapshot Borders – Automating Image Manipulation
Many of the web projects we do have tons of images that require manipulation and processing. Although the GIMP and Adobe Photoshop are extremely powerful tools, they require a user. That would you be you, sitting in your chair, operating on images by hand with your mouse, stylus, and keyboard. You can do amazing things, but a lot of times you’re just processing over and over and over. When you want to speed things up and move on to more interesting tasks, you will turn to ImageMagick, a set of command line utilities for processing images en masse.
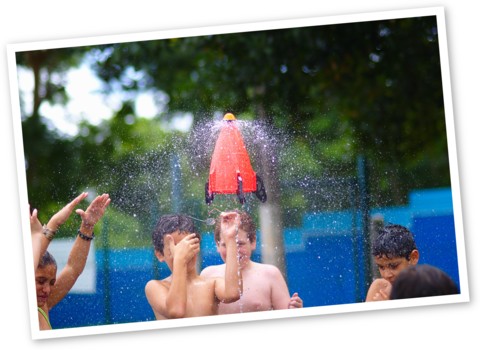
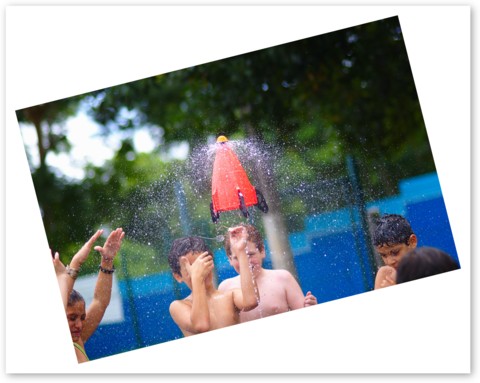
A nice effect that I enjoy is the “snapshotization” of digital photos. Take a look.

Parameters I wish to adjust:
- Rotation (arbitrary)
- Border width and color
- Shadow depth, transparency.
- Background color
So what you want to do is draw a border. ImageMagick’s “convert” has a -bordercolor and -border directives that allow you to set the color and the width. Make sure to set -bordercolor first, because ImageMagick doesn’t parse the command line in a sane way. It’s a small detail, but if you don’t set -bordercolor first, you’ll get gray borders every time. Took me forever to figure out why it wasn’t working for me.
We will now rotate the image with the border. In order to keep our image as a separate entity, i.e. with a transparent background, we need to specify -background none and then apply the -rotate directive. Try this line without -background none to see what I’m talking about.

That’s not what we want, eh? So remember to specify -background none first.
Next you want to use the -shadow directive in a cloned layer. We want to create a layer in memory using the +clone directive, draw a rectangular shape under our first layer with the border, blur the layer and offset it. The default creates a layer above our first one, which is no good, so we swap it and render it as a proper drop shadow. See the script below for a complete example.
#!/bin/bash

BGCOLOR="#ffffff"

file="$1"

RANGE=30
number=$RANDOM
let "number %= $RANGE"
let number=$number-15

WIDTH=`identify -ping -format "%[fx:w]" "$file"`
HEIGHT=`identify -ping -format "%[fx:h]" "$file"`
STROKEWIDTH=`echo "scale=0; $WIDTH/50" | bc `
BLUR=20
SHADOW_OFFSET_X=10
SHADOW_OFFSET_Y=10
CURVATURE="0"

OUTPUT_FILE=`echo "$file" | iconv -f LATIN1 -t ASCII//TRANSLIT`
OUTPUT_FILE=`echo $OUTPUT_FILE | tr "[:upper:] " "[:lower:]_"`
echo $OUTPUT_FILE

convert -quality 90 "$file" -size ${WIDTH}x${HEIGHT} -fill none \
-background none -bordercolor "#ffffff" -border "$STROKEWIDTH" -rotate $number \
\( +clone -background black -shadow "$STROKEWIDTH"x${BLUR}+${SHADOW_OFFSET_X}+${SHADOW_OFFSET_Y} \) \
-swap 0 -background "$BGCOLOR" -layers merge +repage -resize 480x480 "${OUTPUT_FILE%.jpg}_sm.jpg"
$RANDOM is a built in random number generator which I use here to set the arbitrary rotation of the images, between -20 and +20 degrees. It’s simple to return numbers in this range. Take any random number, divide it by your desired range (40 in this case), and retrieve the modulo (remainder). Then subtract half your range to get an even distribution between -20 and +20. It’s an old trick, but it still works.
The variables $WIDTH, $HEIGHT are necessary to set the border and blur parameters. Again, I use ImageMagick to pull in the dimensions of the image in question.
identify -ping -format "%[fx:w]" "$file"
This will get you the width of the input file. "%[fx:w]" will get you the height.
I set $STROKEWIDTH (for borderwidth) to be 1/50th of the image’s width. That’s a pretty good number for what I’m doing. Obviously, you can change that to something else.
I haven’t worked out exactly how ImageMagick’s blur works, but I set $BLUR at 20, which seems to work well (I’m not sure if it’s a pixel value or what). I’ll post more when I figure out exactly what it’s doing and how to control it.
Now this script is not particularly pretty. It doesn’t take any parameters on the command line (except the filename), has no help, and does no input checking. This is a pretty quick hack to solve a simple problem for myself. Maybe later I’ll fancy it up a bit, optimize, and make a proper program out of it, but for now, it solves my problem.
If you want to process a directory of images, you can wrap it in the following:
ls *.jpg | while read file; do script_name "$file"; done
And that’s it. Stupid simple, no?
